The Problem:
Event ID 0
The description for Event ID ( 0 ) in Source ( .NET Runtime ) cannot be found. The local computer may not have the necessary registry information or message DLL files to display messages from a remote computer. You may be able to use the /AUXSOURCE= flag to retrieve this description; see Help and Support for details. The following information is part of the event: Unable to open shim database version registry key - v2.0.50727.00000.
The Solution:
KB918642 - A .NET 2.0 application may require Read/Write permission to a registry
Download the hotfix and apply to the server displaying the error - in my case this was the Index server.
Monday, November 10, 2008
Event ID 7888
The Problem:
I found the following error on my Index Server:
Event ID 7888
A runtime exception was detected. Details follow.
Message: Access Denied! Only site admin can access Data Source object from user profile DB.
Techinal Details:
System.UnauthorizedAccessException: Access Denied! Only site admin can access Data Source object from user profile DB.
at Microsoft.Office.Server.UserProfiles.SRPSite.
AdminCheck(String message)
at Microsoft.Office.Server.UserProfiles.DataSource.
_LoadDataSourceDef(IDataRecord rec)
at Microsoft.Office.Server.UserProfiles.DataSource.
_LoadDataSourceDef(String strDSName)
at Microsoft.Office.Server.UserProfiles.
DataSource..ctor(SRPSite site, Boolean fAllowEveryoneRead)
at Microsoft.Office.Server.UserProfiles.
DataSource..ctor(SRPSite site)
at Microsoft.Office.Server.UserProfiles.
UserProfileConfigManager.GetDataSource()
at Microsoft.Office.Server.UserProfiles.
BDCConnector.RefreshConfiguration(String sspName)
The Solution:
- Open your SSP and navigate to Personalization Services Permissions.
- Select Add User and add your SSP process account with Manage User Profiles permissions.


Crawl Scheduling Error - Access Denied
When you set up your SSPs one of the things you will come across is Crawl Scheduling. This comes under Search Settings and allows you to configure Incremental Crawls and Full Crawls to the frequency you would like. For example, Full crawl once a day, Incremental Crawl every 5 minutes of each day.
The problem:
I received an error whilst building a new farm this week when trying to set the Crawl Schedules.

When I hit Ok I received the error:
ACCESS is DENIED. (Exception from HRESULT: 0x80070005 (E_ACCESSDENIED))
The Solution:
To fix this you need to add the account WSS_WPG to the C:\Windows\Tasks folder on your Index server and apply modify rights.
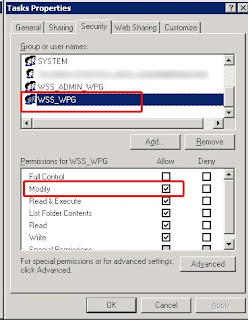
If you cannot see the Security tab on the Tasks folder you need to open a command prompt and type is:
attrib -s %windir%\tasks
When you right click on the tasks folder having done this you should be able to see the Sharing & Security option.
To remove the option once you have applied the changes to the folder open command prompt again and type:
attrib +s %windir%\tasks
Thursday, November 06, 2008
Moving SharePoint Database Data and Log Files
1. Quiesce the Farm
2. Backup all of the databases that you are looking to move.
3. Turn off SharePoint Services (via Services console) to stop the connections to the databases
5. Navigate to where the data and log files are stored and copy them to your destination.
6. Reattach your databases.
7. Restart your services.
8. Un-quiesce the farm.
2. Backup all of the databases that you are looking to move.
3. Turn off SharePoint Services (via Services console) to stop the connections to the databases
a. Office SharePoint Search Service4. Detach the databases that need to be moved.
b. Windows SharePoint Services Administration
c. Windows SharePoint Services Search
d. Windows SharePoint Services Timer
e. Windows SharePoint Services Tracing
f. World Wide Web Publishing Service
5. Navigate to where the data and log files are stored and copy them to your destination.
6. Reattach your databases.
7. Restart your services.
8. Un-quiesce the farm.
Tuesday, November 04, 2008
Changing MOSS service accounts & passwords
I have been preparing some servers for a bunch of testing with PerformancePoint Server (more to follow on this later) which required me to change our MOSS service accounts. Reading around the steps to update these credentials appeared pretty straight forward but as usual MOSS' idiosyncrasies were all to apparent. Here's what i did and how i managed to solve the issues that arose. Hope it helps someone else with the same challenge.
The accounts to be changed were as follows:
1. MOSS Admin Account Update
To update the account old_moss_admin to new_moss_admin:
2. SSP Account Update
To update the SSP account old_ssp_ap to new_ssp_ap:
Attempt 1 - The wrong way...
Attempt 2 - The right way...
I then tried a different approach:
Success: 10 minutes later having searched on Google again and felt thoroughly annoyed at there being no pages I hadn't yet read on this topic I checked the SSP website again and it worked! Checking IIS the accounts have now updated to the new credentials.
At this stage I discovered some new errors in the Event View
3. Application Pool Process Accout Update
To update the web app pool process account old_ap1_process to new_ap1_process:
************************************************************
Useful web sites i visited for this:
The accounts to be changed were as follows:
- old_moss_admin ----> new_moss_admin
- old_ssp_ap ---->new_ssp_ap
- old_ap1_process ---->new_ap1_process
1. MOSS Admin Account Update
To update the account old_moss_admin to new_moss_admin:
- Update the password for the account that is used by the Central Administration application pool. To do this, follow these steps:
- On all servers in the server farm, open a command prompt, type the following line, and then press ENTER:
cd %commonprogramfiles%\Microsoft Shared\Web server extensions\12\Bin - On the server that hosts the Central Administration Web site, type the following line at the command prompt, and then press ENTER:
stsadm -o updatefarmcredentials -userlogin DomainName\UserName -password NewPassword - On all other servers in the server farm, type the following line at the command prompt, and then press ENTER:
stsadm -o updatefarmcredentials -userlogin DomainName\UserName -password NewPassword -local - Restart Microsoft Internet Information Services (IIS) 6.0. To do this, type the following line at the command prompt, and then press ENTER:
iisreset /noforce - Verify that the Administration Application Pool Credential Deployment job definition is no longer displayed on the Timer Job Definitions page of SharePoint 3.0 Central Administration. To do this, follow these steps:
- Open SharePoint 3.0 Central Administration, click Operations, and then click Timer job definitions under Global Configuration.
- Verify that the Administration Application Pool Credential Deployment job definition is no longer displayed in the list.
- I checked & retyped the password in CA web app pool.
- I checked the WSS_WPG, WSS_RESTRICTED_WPG and WSS_ADMIN_WPG local groups on each of the servers - all seemed to be up to date.
- Restarting the CA web app pool makes no difference.
- I checked the IIS_WPG local group on each server. The new_moss_admin account was not updated so i added it to the group.
- I updated the new CA account 'new_moss_admin' to:
- IIS Admin Service
- IIS WAMREG Admin Service
- Restarted IIS.
2. SSP Account Update
To update the SSP account old_ssp_ap to new_ssp_ap:
Attempt 1 - The wrong way...
- Open Central Administration
- Navigate to the Operations page
- Select Service Accounts
- Select the radio button Web app pool
- Select the web service - WSS Web App
- Select the App Pool - SSP1
- Select the radio button Configurable
- Input the new credentials
- Ok
- Restarted IIS on both my servers
Attempt 2 - The right way...
I then tried a different approach:
- Open Central Administration
- Navigate to the Shared Services Aministration homepage
- Hover over SSP1's title and select Edit Properties from the drop down.
- Scroll down to SSP Server Credentials
- Delete the old credentials and input the new account username & password
- Ok
- I then changed the SSP to be the default SSP.
- Open Compnent Services and update the DCOM services IIS Admin & IIS WAMREG with the new account.
- Restarted IIS on both my servers.
Success: 10 minutes later having searched on Google again and felt thoroughly annoyed at there being no pages I hadn't yet read on this topic I checked the SSP website again and it worked! Checking IIS the accounts have now updated to the new credentials.
At this stage I discovered some new errors in the Event View
- Application Server Administration job failed for service instance Microsoft.Office.Server.Search.Administration.SearchServiceInstance (5d77cabf-3414-40cc-a5ef-f30226a9288b).
Reason: The program attempted to update an object that was updated by another user. - Eventid 6482 - Reason: Access to the path 'C:\WINDOWS\system32\drivers\etc\HOSTS' is denied.
This error was now occuring every minute.
The solution to this (and the previous error) can be found in my previous post here: http://bytelab.blogspot.com/2008/02/sharepoint-search-service-cannot-find.html
3. Application Pool Process Accout Update
To update the web app pool process account old_ap1_process to new_ap1_process:
- Open Central Administration
- Navigate to the Operations page
- Select Service Accounts
- Select the radio button Web app pool
- Select the web service - WSS Web App
- Select the App Pool - MOSS Portal
- Select the radio button Configurable
- Input the new credentials
- Ok
- Open Compnent Services and update the DCOM services IIS Admin & IIS WAMREG with the new account.
- Restarted IIS on both my servers
************************************************************
Useful web sites i visited for this:
- Change passwords for Central Administration and Timer service (Windows SharePoint Services) http://technet.microsoft.com/en-us/library/cc288991.aspx
- How to change service accounts and service account passwords in SharePoint Server 2007 and in Windows SharePoint Services 3.0 http://support.microsoft.com/kb/934838
- MOSS 2007 Setup Accounts Clayton J http://claytonj.wordpress.com/2007/04/23/moss-2007-setup-accounts/
- How to change service accounts and their passwords in MOSS and WSS 3.0 http://weblogs.asp.net/erobillard/archive/2007/07/06/how-to-change-service-accounts-and-their-passwords-in-moss-and-wss-3-0.aspx
Thursday, October 30, 2008
InfoPath Forms Services best practices
This comes from: http://technet.microsoft.com/en-us/library/cc261832.aspx
Updated: 2006-12-01
We recommend that you follow these best practices when managing your InfoPath Forms Services environment.
Document limit of 2,000 in Windows SharePoint Services document libraries
If a form template will be filled out and submitted more than 2,000 times in total, you should either write code in the form template to submit to a database by using a Web service, or create a custom submit function that places forms into multiple libraries. This is due to a limitation in the capacity of Windows SharePoint Services 3.0 document libraries, which may experience performance degradation if more than 2,000 documents exist in the library.
If you think a form template may be submitted more than 2,000 times, it is easier to begin by programming the form to use an alternative submit method than to correct this issue once it becomes a problem, particularly if the form template is available to a publicly accessible Web site.
Use Form View when configuring session state for InfoPath Forms Services
You can configure InfoPath Forms Services to use the Session State Service (the default option) or Form View to control how user sessions are managed. When you configure InfoPath Forms Services to use the Session State Service, all browser sessions are maintained on the SQL Server database corresponding with the Shared Services Provider (SSP) associated with the Web application on which the form template is hosted. This scenario uses little network bandwidth, but has a cumulative performance impact on the computer running SQL Server. When you are using Form View, sessions are maintained on the client browser, and all session data is included in each postback to the server, up to 40 kilobytes of session data. This uses more bandwidth than using session state, but does not affect the computer running SQL Server. Once session data reaches 40 KB in size, the session automatically transitions to session-state management.
We recommend the use of Form View in environments that have smaller groups of users, because it reduces the impact on SQL Server. If your InfoPath Forms Services deployment will have many users, particularly if session data is below 40 KB for many high-usage form templates, session state is likely a better choice. If Form View is used, the bandwidth used by browser sessions of 40 KB or fewer can be monitored if there is a concern that network performance might be adversely affected.
Running SQL Server on a front-end Web server is not recommended
If you run SQL Server on an Office SharePoint Server front-end Web server (for example, in a single-server evaluation deployment), the ASP.NET cache will release system memory at a lower threshold than SQL Server, which could result in InfoPath Forms Services memory starvation.
ASP.NET employs a strategy of targeting maximum Internet Information Services (IIS) memory use of the lesser of either 800 megabytes or 60% of available physical RAM. These settings are configurable in IIS manager. ASP.NET also monitors physical RAM use, not just for the w3wp.exe process, but for the entire system. When 80% of the physical memory on the server is committed, ASP.NET begins periodically dropping the oldest and lowest priority 5% of the cache. When 85% of physical memory is committed, ASP.NET drops 50% of the cache periodically. At 90% or more, ASP.NET aggressively trims the cache and sets a low limit on the maximum number of entries, which remains in effect until ASP.NET reassesses memory pressure on the server and raises the threshold.
The memory usage threshold for SQL Server is higher by default than the ASP.NET cache. In this scenario, SQL Server never releases memory, because the ASP.NET cache will already have released memory before the SQL Server threshold is reached. This situation can lead to a condition in which the throughput of InfoPath Forms Services is reduced with a subsequent impact on performance.
To mitigate this issue, you should configure SQL Server memory limits manually when SQL Server is installed on the same computer as Office SharePoint Server. For more information on adjusting SQL Server memory settings, see the article Server Memory Options (http://msdn.microsoft.com/library/default.asp?url=/library/en-us/adminsql/ad_config_9zfy.asp) on the Microsoft Web site.
Best practices for anonymously accessible forms
When you deploy a form to a location where it is exposed to anonymous users, such as a public SharePoint document library or an embedded form in a Web page on the Internet, ensure the integrity of your form. There are several additional steps you should take to mitigate the risk of improper form usage, Denial of Service (DoS) exploits, and potential performance issues.
- Ensure that form templates cannot be accessed by scripts or other automated processes. One way to achieve this is to force users who are submitting a form template to enter an identification code such as a short alphanumeric string displayed in an image, which cannot be "read" by a script or automated process.
- Form templates that contain sensitive information such as authentication information, server or database names, or proprietary code should never be exposed to anonymous users.
- Form templates that contain an e-mail submit data connection should not be deployed to servers that are anonymously accessible, as e-mail messages generated when the form is submitted will show "sent by anonymous user" in the Subject line.
- Form templates that contain code or functionality that can invoke processes on a server should be carefully evaluated and tested to ensure that security cannot be compromised by making the form template accessible to anonymous users.
- In order to prevent users from submitting multiple copies of a form, you might consider including code that tracks the IP address of each user who submits a form and prevents duplicate submissions from the same IP address.
- Protect the integrity of form templates by enabling protection to prevent the form template from being changed.
Thursday, October 23, 2008
MOSS Page Setting Error - Value does not fall within the expected range
Thanks to these guys for the solution
I found an error when trying to change the Page Settings of a default.aspx in one of my sites today.
I wanted to update the page layout template in use but on selecting Page Settings from either the Page drop down in edit mode or from the Site Content & Structure page i received the follwoing error:
Value does not fall within the expected range
- Open the site in SharePoint Designer
- Select File / Export and choose the page you are trying to update
- Open the page locally using Notepad
- Search the source for “mso:PublishingPageLayout"
- Look at the path :
- The string points to my old development environment http://mossdev
- Update the path to the live environment eg: http://mosslive
- Save the file
- In SharePoint Designer select File / Import and choose the modified file
- Check the files back in and approve them.
Thursday, October 09, 2008
SSP Stuck on Unprovisioning
I tried to delete a test SSP the other day via Central Administration. Having selected the options to also delete associated content databases and web applications i hit ok and left it to run. The SSP status changed to 'Unprovisioning' and an hour later was still stuck.
I then followed this example in the hope the SSP would delete.
System Failure: Stop error
Reason Code: 0x805000f
Bug ID:
Bugcheck String: 0x000000c5 (0x00000004, 0xd0000002, 0x00000001, 0x8089bce3)
Comment: 0x000000c5 (0x00000004, 0xd0000002, 0x00000001, 0x8089bce3)
I then discovered that the search was no longer working. Submiting a query returned the following error:
Cannot connect to the search service
The status of the test SSP i had tried to delete was still stuck on 'Unprovisioning'. Also the other SSPs 'Edit Properties' pages in Central Administration were no longer available and returned the following error:
An unhandled exception occurred in the user interface.Exception Information: Cannot open database "xxx" requested by the login. The login failed. Login failed for user 'xxx'.
In the event log on the server I found multiple instances of the following error:
Application Server Administration job failed for service instance Microsoft.Office.Server.Search.Administration.SearchServiceInstance (e6a1ecb4-3aa8-45cd-a179-d7e053aa927a).
Reason: Cannot open database "xxx" requested by the login. The login failed.
Login failed for user 'xxx'.
Solution:
I then followed this example in the hope the SSP would delete.
- http://prequest01.wordpress.com/2008/08/16/unable-to-delete-shared-services/
- Tried: stsadm -o deletessp "TestSSP" –force, but this did not work
- Login to SQL server.
- Open SQL Management Studio and expend Databases.
- Expand Configuration Database & Tables.
- Opened table for dbo.object.
- Executed following query in query analyzer: SELECT * FROM [MOSS_CFG_CA_01].[dbo].[Objects]where name like ‘Name of the Shared Services’.
- Copy the ID of object referenced in objects table of configuration database.
- Open command prompt and changed directory to C:\Program Files\Common Files\Microsoft Shared\web server extensions\12\BIN> and executed following command to delete the Shared Services using the ID which was copied: Stsadm -o deleteconfigurationobject -id “id retrieved from object table”
- To clean up we decide to delete the DBs via SQL Management Studio and delete the web applications via Central Administration.
System Failure: Stop error
Reason Code: 0x805000f
Bug ID:
Bugcheck String: 0x000000c5 (0x00000004, 0xd0000002, 0x00000001, 0x8089bce3)
Comment: 0x000000c5 (0x00000004, 0xd0000002, 0x00000001, 0x8089bce3)
I then discovered that the search was no longer working. Submiting a query returned the following error:
Cannot connect to the search service
The status of the test SSP i had tried to delete was still stuck on 'Unprovisioning'. Also the other SSPs 'Edit Properties' pages in Central Administration were no longer available and returned the following error:
An unhandled exception occurred in the user interface.Exception Information: Cannot open database "xxx" requested by the login. The login failed. Login failed for user 'xxx'.
In the event log on the server I found multiple instances of the following error:
Application Server Administration job failed for service instance Microsoft.Office.Server.Search.Administration.SearchServiceInstance (e6a1ecb4-3aa8-45cd-a179-d7e053aa927a).
Reason: Cannot open database "xxx" requested by the login. The login failed.
Login failed for user 'xxx'.
Solution:
- Restart the Office SharePoint Server Search service in via the Computer Management console - Search still not working.
- I retried the STSADM CMD
stsadm -o deletessp "TestSSP" –force
Monday, September 29, 2008
MOSS Search Broken
MSS search has been broken for a few weeks now. One of the issues with the fault has been that MOSS had stopped writing to the error logs so we had no way of finding specific error inforation. I logged a call with Microsoft because of this and they suggested that i recreate the SSPs as they must be coorupt.
I tested this by creatiing a new SSP and true enough it did allow search queries and returned results. But, recreating our SSPs is no small job because once you do so you have to recreate all your customisations as well. This means redeploying custom webparts and setting them up on your sites. Recreateing audiences and resetting targeted content on the sites, etc etc. Depending on your set up this can take quite an effort.
Before heading down the last resort of recreating the SSPs i decided to try and solve the issues first. For info I am running a standard installation with 3 servers:
******************************************************
Attempt 1
Attempt 2
Attempt 3
One remaining error in the event log is now: Tracing Service failed to create the trace log file directory 'D:\MOSS\12\LOGS'. Error 3: The system cannot find the path specified.
******************************************************
General Error List
Some of the errors i have worked through are listed here:
I tested this by creatiing a new SSP and true enough it did allow search queries and returned results. But, recreating our SSPs is no small job because once you do so you have to recreate all your customisations as well. This means redeploying custom webparts and setting them up on your sites. Recreateing audiences and resetting targeted content on the sites, etc etc. Depending on your set up this can take quite an effort.
Before heading down the last resort of recreating the SSPs i decided to try and solve the issues first. For info I am running a standard installation with 3 servers:
- MOSS01 - Index
- MOSS02 - WFE
- MOSS03 - Query & Central Admin
******************************************************
Attempt 1
- Reboot Index server
- Reboot Query server
- Propagate the Index file to a new location using STSADM
stsadm -o osearch -propagationlocation
Attempt 2
- Start the Indexing service on the MOSS Index server using Computer Management / Services
- Stop the Search Services (Index & Query) using STSADM
stsadm -o osearch -action stop - Start the Search Services (Index & Query) using STSADM
stsadm -o osearch -action start
Attempt 3
- Reset the Indexer in each SSP to the Index server via Central Admin SSP Proerties page
- Add the process accounts to each SSP on the Edit Properties page - http://ssp/admin/_layouts/searchsspsettings.aspx
- Set the security for C:\Windows\Tasks to read & write for the WSS_WPG account:
- On the Index server make sure that you can see the Sharing and Security tab in the Windows tasks folder (usually C:\Windows\Tasks) by open a command prompt and type attrib –s %windir% \tasks.
- Browse to C:\Windows\Tasks in explorer, right click and select properties. Grant the WSS_WPG group Read and Write permissions on the tasks folder.
- Open a command prompt and type attrib +s %windir% \tasks to reset the tasks folder to its default view.
- Delete the content index in each SSP
- Start a full crawl in each SSP
- SSP1 status - Propagating to new Query server. Search index status 'Computing ranking'. Search not working. When I manually started a crawl, there's a pop up message saying 'Crawling might be paused because a backup or an index move operation is in progress. Are you sure you want to resume this crawl?' Selected 'Yes'.
- SSP2 status - Propagating to new Query server - Search not working
- SSP3 status - Propagating - Search is working
- SSP4 status - Idle - Search is working
- Reboot Index & Query servers
- Stop the Search Services (Index & Query) using Central Administration
- Recreate the Search Services (Index & Query) using Central Administration
- Reset the Indexer in each SSP to the Index server
- Set the security for C:\Windows\Tasks to read & write for the WSS_WPG account
- Reset the content index in each SSP
- Start a full crawl in each SSP
One remaining error in the event log is now: Tracing Service failed to create the trace log file directory 'D:\MOSS\12\LOGS'. Error 3: The system cannot find the path specified.
******************************************************
General Error List
Some of the errors i have worked through are listed here:
- Your search cannot be completed because of a service error. Try your search again or contact your administrator for more information
- Reassociating the indexer and search service with the ssp under application management on the central administration site
- Content index on Portal_Content could not be initialized. Error The content index is corrupt.
- Query server not responding
- http://brijesh.spaces.live.com/blog/cns!BFBD772FBDA58C6D!194.entry
- stsadm.exe –o osearch –propagationlocation index file path
- Run a full crawl
- Could not create a database session
- http://social.technet.microsoft.com/Forums/en-US/sharepointsearch/thread/e277cc4f-03d9-4424-af1a-a167fd3c6186/
- Open Central Admin
- In the Application Tab go to Create or Manage this farm's shared services
- Click the drop down of the SSP you want to edit, and click edit
- Add the Indexing server
- Error trying to access the SSP search settings page: http://ssp/admin/_layouts/searchsspsettings.aspx - 403 FORBIDDEN
- See next solution below http://support.microsoft.com/kb/926959
- Error when you try to edit the content source schedule in Microsoft Office SharePoint Server 2007: "Access is denied"
- http://support.microsoft.com/kb/926959
To work around this issue, you must add the WSS_WPG group to the Tasks folder. To do this, follow these steps: - Use an account that has administrative permissions to log on to the computer that is running the Office SharePoint Server 2007 indexing service.
- Click Start, click Run, type cmd, and then click OK.
- At the command prompt, type the following command, and then press ENTER:
attrib –s %windir%\tasks
Note In this example, %windir% is the path of the Windows folder. For example, the path can be C:\Windows.
Note If Windows Explorer is open when you make this change, you will not see the extra tab in Windows Explorer. If Windows Explorer is already open, close and then reopen it before you perform step 4. - In Windows Explorer, right-click the Tasks folder, and then click Properties.
- In the Tasks Properties dialog box, click the Security tab, and then click Add
- In the Select Users, Computers, or Groups dialog box, type WSS_WPG in the Enter object names to select box, and then click OK.
- Grant the following permissions for the WSS_WPG account, and then click OK: Read & Write
- Click Start, point to Administrative Tools, and then click Internet Information Services (IIS) Manager.
- In Internet Information Services (IIS) Manager, right-click ComputerName (local computer), click All Tasks, and then click Restart IIS.
- Click Start, click Run, type cmd, and then click OK.
- At the command prompt, type the following command, and then press ENTER:
attrib +s %windir%\tasks
Note This resets the Tasks Property back to the default view.
- The search service is currently offline. Visit the Services on Server page in SharePoint Central Administration to verify whether the service is enabled. This might also be because an indexer move is in progress.
- http://www.sharepointblogs.com/jasonmedero/archive/2008/09/15/moss-2007-error-when-moving-indexing-role-the-search-service-is-currently-offline-visit-the-services-on-server-page.aspx
- Stop and start search services on new index server and all servers running the query role
- Then restarted the search service via central administration under operations tab>>Services
- Went into Services.msc and found the Office Search Service and restarted it manually
- Checked to make sure that the search service account had correct rights to SQL.
- None of the above worked so...
- Going into the SSP settings (clicking on SSP administration not the SSP link itself) within the left quick launch navigation from within central administration.
- Selecting the dropdown arrow next to the SSP where I was having the search issue
- Select edit properties
- Within the properties screen of the SSP look for the “Process accounts”
- Make sure that your search account is in there!
- Test Shared Service Provider stuck on 'Unprovisioning' after trying to delete it and associated databases.
- http://prequest01.wordpress.com/2008/08/16/unable-to-delete-shared-services/
- Login to SQL server.
- Open SQL Management Studio and expend Databases.
- Expand Configuration Database & Tables.
- Opened table for dbo.object.
- Executed following query in query analyzer: SELECT * FROM [MOSS_CFG_CA_01].[dbo].[Objects]where name like ‘Name of the Shared Services’.
- Copy the ID of object referenced in objects table of configuration database.
- Open command prompt and changed directory to C:\Program Files\Common Files\Microsoft Shared\web server extensions\12\BIN> and executed following command to delete the Shared Services using the ID which was copied: Stsadm -o deleteconfigurationobject -id “id retrieved from object table”
- The search request was unable to connect to the Search Service
- http://anuraj.wordpress.com/2007/10/25/the-search-request-was-unable-to-connect-to-the-search-service/
- Start the Indexing service, which is disabled by default.
- Go to Services from Control Panel > Administrative Tools > Services
- Select the Indexing service, right click and choose the option start
Tuesday, June 17, 2008
SharePoint RSS Viewer Error
Having added the SharePoint OOB RSS web part on to my site and configured it to point to a feed i received the following error in the log:
RssWebPart: Exception handed to HandleRuntimeException.HandleException System.Net.WebException: Unable to connect to the remote server
Found the solution here: http://yasirbutt.spaces.live.com/blog/cns!A8677D5751E6B4DA!1409.entry
The following needs adding to the site web.config file (at the bottom of the file):
<system.net>
<defaultProxy>
<proxy usesystemdefault = "false" proxyaddress="http://proxyservername" bypassonlocal="true" />
</defaultProxy>
</system.net>
Friday, June 13, 2008
The type or namespace name 'Publishing' does not exist in the namespace 'Microsoft.SharePoint'
I started playing around with a copy of default.master yesterday and added in a CssRegistration link to the header:
<SharePoint:CssRegistration name="<% $SPUrl:~SiteCollection/Style Library/CustomMySiteRegistration.css %>" runat="server"/
After deploying the master page to SharePoint i received the following error:
An error occurred during the processing of . c:\WINDOWS\Microsoft.NET\Framework\v2.0.50727\Temporary ASP.NET Files\root\dff54803\4595fc0a\App_Web_custommysite.master_1096277560.2bgek7y-.0.cs(1389): error CS0234: The type or namespace name 'Publishing' does not exist in the namespace 'Microsoft.SharePoint' (are you missing an assembly reference?)
Thanks to Tom Meskens for posting the error here's the solution.
The default.master file doen't include the publishing assembly declarations required. They need to be added in as follows:
<%@ Register Tagprefix="PublishingWebControls" Namespace="Microsoft.SharePoint.Publishing.WebControls" Assembly="Microsoft.SharePoint.Publishing, Version=12.0.0.0, Culture=neutral, PublicKeyToken=71e9bce111e9429c" %>
<%@ Register Tagprefix="PublishingNavigation" Namespace="Microsoft.SharePoint.Publishing.Navigation" Assembly="Microsoft.SharePoint.Publishing, Version=12.0.0.0, Culture=neutral, PublicKeyToken=71e9bce111e9429c" %>
<%@ Register TagPrefix="PublishingVariations" TagName="VariationsLabelMenu" src="~/_controltemplates/VariationsLabelMenu.ascx" %>
<%@ Register Tagprefix="PublishingConsole" TagName="Console" src="~/_controltemplates/PublishingConsole.ascx" %>
<%@ Register TagPrefix="PublishingSiteAction" TagName="SiteActionMenu" src="~/_controltemplates/PublishingActionMenu.ascx" %>
Republish the master page and hoorah - no more error!
<
After deploying the master page to SharePoint i received the following error:
An error occurred during the processing of . c:\WINDOWS\Microsoft.NET\Framework\v2.0.50727\Temporary ASP.NET Files\root\dff54803\4595fc0a\App_Web_custommysite.master_1096277560.2bgek7y-.0.cs(1389): error CS0234: The type or namespace name 'Publishing' does not exist in the namespace 'Microsoft.SharePoint' (are you missing an assembly reference?)
Thanks to Tom Meskens for posting the error here's the solution.
The default.master file doen't include the publishing assembly declarations required. They need to be added in as follows:
<%@ Register Tagprefix="PublishingWebControls" Namespace="Microsoft.SharePoint.Publishing.WebControls" Assembly="Microsoft.SharePoint.Publishing, Version=12.0.0.0, Culture=neutral, PublicKeyToken=71e9bce111e9429c" %>
<%@ Register Tagprefix="PublishingNavigation" Namespace="Microsoft.SharePoint.Publishing.Navigation" Assembly="Microsoft.SharePoint.Publishing, Version=12.0.0.0, Culture=neutral, PublicKeyToken=71e9bce111e9429c" %>
<%@ Register TagPrefix="PublishingVariations" TagName="VariationsLabelMenu" src="~/_controltemplates/VariationsLabelMenu.ascx" %>
<%@ Register Tagprefix="PublishingConsole" TagName="Console" src="~/_controltemplates/PublishingConsole.ascx" %>
<%@ Register TagPrefix="PublishingSiteAction" TagName="SiteActionMenu" src="~/_controltemplates/PublishingActionMenu.ascx" %>
Republish the master page and hoorah - no more error!
Thursday, June 05, 2008
Submit InfoPath forms to SharePoint with unique filenames
This is a follow up to an issue that i initially encountered a couple of months ago when we first deployed an Infopath form to SharePoint. The original thread can be viewed here: SharePoint User Group UK
As Colin pointed out in his comment our approach left us open to the possibility of duplicate records since users could simultaneously open a new form and thereby taking the same last max id from the form library.
Although it appeared to users as though duplication was occuring, in reality the record is not duplicated because SharePoint asigns its own unique ID which automatically increments with each new record.
I have now updated the form as suggested by J_A_G, which also has the advantage of using no code.
This works by applying 2 rules to a hidden field on the form. Documents are assigned a unique filename based on the concat() function by concatenating fields in the form with the now() function. The rules determin whether or not the filename field is blank; if not it is not updated - without these rules each time a form is reopened and resubmitted it would be saved as a new form instance with a different filename as opposed to just updating an existing one.
Here's how to set this up:
- Add a hidden field to the form called 'fileName'
- Create a SharePoint Data Connection to set the InfoPath file name to the hidden field fileName
- Check the box 'Allow overwrite if file exists'
- Open Tools / Submit Options
- Select radio button 'Perform custom action using rules'
- Click the Rules button
- Add Rule 1 (filename is blank)
- Set condition 1: if fileName is blank
- Set action 1: set field's value fileName = concat(myfield, now())
- Set action 2: submit using a data connection: (the DC you created earlier)
- Add Rule 2 (filename is not blank)
- Set condition 1: if fileName is not blank
- Set action 1: submit using a data connection: (the DC you created earlier)


Filtering MOSS lists with the [Me] function
To filter content in SharePoint libraries and lists so that users only see items that they created or modified use the [Me] filter. The filter will only work with SharePoint user IDs for example Created By / Modified By. It won't work with custom created fields like User Name unless it is associated with a SharePoint ID. (See Greg Collins blog post "Use the SharePoint '[Me]' Filter with a Promoted Property", for other functions see WSS FAQ)


Monday, June 02, 2008
My Site Horizontal Navigation
To add tabs for specific users to their My Site: 
- Open Shared Services and navigate to Personalisation Site Links
- Add a new item providing URL, Owner & Target Audience
- Click Ok
- Refresh My Site and you should see the new link in between the My Home and the My Profile tabs

Wednesday, May 21, 2008
Content Query Web Part - Custom Item Style
- Open SharePoint Designer and go to the site Style Library
- Open the file: ItemStyle.xml
- Copy the following code or one of the existing styles from the XML
- Modify the XML as required; for example the code below places an image on the left of a title, in this case used for portal news headlines.
- Check in the XML file
- Refresh the page you are editing the CQWP on and open the Presentation section of the CQWP edit panel. The new style should now be listed under Item Style.


<xsl:template name="NewsHeadline" match="Row[@Style='NewsHeadline']" mode="itemstyle">
<xsl:variable name="SafeLinkUrl">
<xsl:call-template name="OuterTemplate.GetSafeLink">
<xsl:with-param name="UrlColumnName" select="'LinkUrl'"/>
</xsl:call-template>
</xsl:variable>
<xsl:variable name="SafeImageUrl">
<xsl:call-template name="OuterTemplate.GetSafeStaticUrl">
<xsl:with-param name="UrlColumnName" select="'ImageUrl'"/>
</xsl:call-template>
</xsl:variable>
<xsl:variable name="DisplayTitle">
<xsl:call-template name="OuterTemplate.GetTitle">
<xsl:with-param name="Title" select="@Title"/>
<xsl:with-param name="UrlColumnName" select="'LinkUrl'"/>
</xsl:call-template>
</xsl:variable>
<xsl:variable name="LinkTarget">
<xsl:if test="@OpenInNewWindow = 'True'" >_blank</xsl:if>
</xsl:variable>
<div id="linkitem" class="item">
<xsl:if test="string-length($SafeImageUrl) != 0">
<div class="image-area-left">
<a href="{$SafeLinkUrl}" target="{$LinkTarget}">
<img class="image" src="{$SafeImageUrl}" alt="{@ImageUrlAltText}" />
</a>
</div>
</xsl:if>
<div class="link-item">
<xsl:call-template name="OuterTemplate.CallPresenceStatusIconTemplate"/>
<strong><a href="{$SafeLinkUrl}" target="{$LinkTarget}" title="{@LinkToolTip}">
<xsl:value-of select="$DisplayTitle"/>
</a></strong>
</div>
</div>
</xsl:template>
Wednesday, March 26, 2008
Creating web part pages in a custom Pages library
I just created a new document library called "IS Email Newsletter Pages" and set the content type to Pages with the idea that this would create a new place to store web part pages in my SP site.
When i click on New on the document library toolbar i am redirected to Create Page where we fill in the page title, description, URL name and layout type etc.
I was expecting the URL name to reflect the new document library URL (IS Email Newsletter Pages/testpage.aspx) but it doesn't - it still points to the original Pages library (Pages/testpage.aspx) and when the page is created it is created in the Pages library.

Does anyone know how to create pages in a custom pages library???
Tuesday, March 11, 2008
SharePoint Web Service Reference
| WSS Web Services | Web Reference |
| Administration Service | http:// |
| Alerts Service | http:// |
| Document Workspace Service | http:// |
| Forms Service | http:// |
| Imaging Service | http:// |
| List Data Retrieval Service | http:// |
| Lists Service | http:// |
| Meetings Service | http:// |
| Permissions Service | http:// |
| Site Data Service | http:// |
| Site Service | http:// |
| Users and Groups Service | http:// |
| Versions Service | http:// |
| Views Service | http:// |
| Web Part Pages Service | http:// |
| Webs Service | http:// |
Monday, March 03, 2008
Problems with Infopath forms using host headers & ISA Servers
Last week I published my first InfoPath form and discovered that some users could not access or submit the form.
Our users access SharePoint sites and our InfoPath form in 1 of 3 different ways:
Looking at our network configuration i placed a big bet that the problem was something to do with the fact that we were using host headers so i started searching google for anything related.
The following post seemed exactly the same as our scenario: http://forums.microsoft.com/TechNet/ShowPost.aspx?PostID=2777878&SiteID=17
I toyed with the idea of changing the host headers and tried publishing the form in as many different ways as possible (domain trust direct to a doc library, full trust, administrator approved & managed through Central Administration etc etc). No luck.
Problem 1 Detail:
Intranet & Extranet users could access and submit the form. However there were access problems for ISA server users with the following error message:
The following location is not accessible, because it is in a different site collection: http://intranet.ourcompany.othercompany.com/Infopath/Forms/template.xsn
The solution:
To resolve this I added the http://intranet.ourcompany.othercompany.com URL to the alternate access mappings in Central Administration and users were immediately then able to open the form.
Problem 2 Detail:
The following error message was generated on submitting the form (also for ISA server users):
The form cannot be submitted to the Web server either because your computer is offline or because the host server is currently unavailable. If this problem persists, contact your network administrator.
On closing the form users were then redirected to http://intranet (the URL that the form is published to in InfoPath) which of course they could not access.
The solution:
We had to search high and low for the answer which thankfully came from the following post: http://forums.microsoft.com/MSDN/ShowPost.aspx?PostID=2386461&SiteID=1
Basically we added a Link Translation rule in the ISA Server to replace the FQDN InternalDomain with ExternalDomain (Without http://)
Eg:
Our users access SharePoint sites and our InfoPath form in 1 of 3 different ways:
- Via the Intranet: http://intranet
- Via the Extranet: http://extranet.ourcompany.com
- Via the ISA Server: http://intranet.ourcompany.othercompany.com
Looking at our network configuration i placed a big bet that the problem was something to do with the fact that we were using host headers so i started searching google for anything related.
The following post seemed exactly the same as our scenario: http://forums.microsoft.com/TechNet/ShowPost.aspx?PostID=2777878&SiteID=17
I toyed with the idea of changing the host headers and tried publishing the form in as many different ways as possible (domain trust direct to a doc library, full trust, administrator approved & managed through Central Administration etc etc). No luck.
Problem 1 Detail:
Intranet & Extranet users could access and submit the form. However there were access problems for ISA server users with the following error message:
The following location is not accessible, because it is in a different site collection: http://intranet.ourcompany.othercompany.com/Infopath/Forms/template.xsn
The solution:
To resolve this I added the http://intranet.ourcompany.othercompany.com URL to the alternate access mappings in Central Administration and users were immediately then able to open the form.
Problem 2 Detail:
The following error message was generated on submitting the form (also for ISA server users):
The form cannot be submitted to the Web server either because your computer is offline or because the host server is currently unavailable. If this problem persists, contact your network administrator.
On closing the form users were then redirected to http://intranet (the URL that the form is published to in InfoPath) which of course they could not access.
The solution:
We had to search high and low for the answer which thankfully came from the following post: http://forums.microsoft.com/MSDN/ShowPost.aspx?PostID=2386461&SiteID=1
Basically we added a Link Translation rule in the ISA Server to replace the FQDN InternalDomain with ExternalDomain (Without http://)
Eg:
- http://intranet.ourcompany.othercompany.com
- intranet.ourcompany.othercompany.com
Thursday, February 21, 2008
Creating Tabbed Views in InfoPath 2007
This comes from: InfoPath Team Blog
InfoPath doesn't have a built-in Tab Control, but it's easy enough to build one using tables, buttons, and views, so let's do it!
InfoPath doesn't have a built-in Tab Control, but it's easy enough to build one using tables, buttons, and views, so let's do it!
The basic idea
Here's what to build:
- Views for the contents of each tab
- Table with shading to give the visual effect of tabs
- Buttons for each tab with a rule that switches the view
For example:

Then when the user clicks "Details" they switch views to see this:

How To, with tricks along the way
- Create all of your views (from the Views task pane)
- Select the same color scheme for each view (use the Color Schemes task pane)
- Use Background Color on the Format menu to make the background of each view the second color for the current color scheme (the second-darkest color at the top of the color picker)
-
- Insert a layout table (on the Insert menu, click Table)
- Make it two rows high. The first row will be for the buttons, the second will be for the tab content.
- Split the first row to make a cell for each view, plus one extra cell to take the remaining horizontal space.
-
- Insert a button into each cell (from the Controls task pane)
- Add a rule to each button to switch to the corresponding view. Do this even for the current view's button.
- Make the current "active" button Bold, so it stands out.
-
- Use borders and shading (on the Format menu)
- Select all the buttons at once (hold down the Control key and click each one), then remove all borders and shading from the buttons (they're invisible except for their label!).
- Select the entire table, then add borders inside and out using the first color in the color scheme (the darkest color).
- Select the non-active cells and set their shading to the third lightest color of the color scheme.
- Select the active cell and the content cell, and set their shading to white.
- Select the active cell and remove the bottom border so it becomes connected to the content cell.
- Select the right-most "extra" cell and remove the top and right border
-
- Copy the table to each view
- Update the borders and shading to change the "active" cell for each view
- Put all your fields for each tab in its content cell
-
Getting fancy
If the tabs above aren't pretty enough for your form, add some images inside a few more table cells around each button to provide rounded corners and other visual effects. It's more work, and requires some image editing, but with a little elbow grease you could get something as schmancy as this:
Tuesday, February 19, 2008
2007 Office System Tool: Outlook HTML and CSS Validator
To download the MS plugin to validate HTML & CSS for Office Outlook 2007 emails go here: http://www.microsoft.com/downloads/details.aspx?FamilyId=0B764C08-0F86-431E-8BD5-EF0E9CE26A3A&displaylang=en#filelist
Word 2007 HTML and CSS Rendering Capabilities in Outlook 2007 (Part 1 of 2)
Word 2007 HTML and CSS Rendering Capabilities in Outlook 2007 (Part 2 of 2)
Installing on Macromedia Dreamweaver 8:
When installing this for Macromedia Dreamweaver 8 you must change the path to which it installs from Dreamweaver MX 2004 to Dreamweaver 8 -
Change the path:
C:\Program Files\Macromedia\Dreamweaver MX 2004\Configuration\BrowserProfiles
To the path:
C:\Program Files\Macromedia\Dreamweaver 8\Configuration\BrowserProfiles

If you dont change the path you won't see the Microsoft Word check box available in the Target Browsers dialogue box in Dreamweaver 8:

This is not mentioned in the official documentation / installation instructions provided by MS.
Thursday, February 14, 2008
Enable Anonymous Access
This info originally came from: http://weblogs.asp.net/bsimser/archive/2006/09/25/Enabling-anonymous-access-in-SharePoint-2007.aspx
First, enable anonymous on the IIS web site:
- Launch IIS - Start / Administration Tools / IIS
- Select the web site, right click and select Properties
- Click on the Directory Security tab
- Click on Edit in the Authentication and access control section
Or, using the Central Administration section:
- Central Administration / Application Management
- Select “Authentication Providers” in the “Application Security” section
- Click on the “Default” zone (or whatever zone you want to enable anonymous access for)
- Under “Anonymous Access” click the check box to enable it and click “Save”


NOTE: Make sure the “Web Application” in the menu at the top right is your portal/site and not the admin site.
You can confirm that anonymous access is enabled by going back into the IIS console and checking the Directory Security properties.
Next, enable anonymous access in the web site.
- In your web site navigate to the site settings page. MOSS: Site Actions / Site Settings / Modify All Site Settings. WSS: Site Actions / Site Settings.
- Under the “Users and Permissions” section click on “Advanced permissions”

- On the “Settings” drop down menu (on the toolbar) select “Anonymous Access”
- Select the option you want anonymous users to have (full access or documents and lists only)


Now users without logging in will get whatever option you allowed them.
A couple of notes about anonymous access:
- You will need to set up the 2nd part for all sites unless you have permission inheritance turned on
- If you don’t see the “Anonymous Access” menu option in the “Settings” menu, it might not be turned on in Central Admin/IIS. You can manually navigate to “_layouts/setanon.aspx” if you want, but the options will be grayed out if it hasn’t been enabled in IIS
- You must do both setups to enable anonymous access for users, one in IIS and the other in each site
Wednesday, February 13, 2008
SharePoint Search Service cannot find hosts file
I have been trying out various scenarios on a dev farm consisting of 2 SharePoint servers and a SQL box to see what happens...
If you start mucking around with search services and stop or change your search index server you may come accross the following error:
Application Server Administration job failed for service instance Microsoft.Office.Server.Search.Administration.SearchServiceInstance Reason: Could not find file 'C:\WINDOWS\system32\drivers\etc\HOSTS'.
This is because the Sharepoint Timer job deletes the hosts file after you modify the web front end the crawler is pointed to. I created a new hosts file in 'C:\WINDOWS\system32\drivers\etc\' and then came across the next error:
Application Server Administration job failed for service instance Microsoft.Office.Server.Search.Administration.SearchServiceInstance Reason: Access to the path 'C:\WINDOWS\system32\drivers\etc\HOSTS' is denied.
To solve this update the permissions on the 'C:\WINDOWS\system32\drivers\etc' directory for the WSS_Admin_WPG account allowing the following advanced permissions:
- Traverse Folder / Execute File
- List Folder / Read Data
- Read Attributes
- Read Extended Attributes
- Create Files / Write Data
- Read Permissions
- Delete Permissions
An indexer is not assigned to the Shared Services Provider.
The problem:
Error when trying to view profile information in your Shared Service Provider:
Error when trying to view profile information in your Shared Service Provider:
An error has occurred while accessing the SQL Server database or the Office SharePoint Server Search service. If this is the first time you have seen this message, try again later. If this problem persists, contact your administrator.
Error when trying to view the search settings in your Shared Service Provider:
An indexer is not assigned to the Shared Services Provider.
This will occur if you stop your search service - in which case you will also need restart the service!
Solution:
- Open Central Administration
- Go to Shared Services Administration
- Click the SSP and select edit properties from its drop down list

- Enter the SSP process account password
- Assign the index server

- Select Ok


Move Central Administration to another server in your farm
- On the existing farm Central Administration server (DEV01W2K3) remove the Central Administration website:
- Run the SP configuration wizard
- Select: Do not disconnect from the server farm (Warning: Disconnecting from the server farm will result in all your web applications being deleted from IIS. They can be recreated if you reconfigure central administration again and link to the existing configuration DB, but they will be unavailable until that time. That means no web sites available and more down time than necessary!)
- Select: Yes, I want to remove the website from this machine
- Select: Ok
Note: The configuration wizard will stop IIS and all websites may become unavailable for a few minutes while it steps through the processes. Ensure that you do not delete any databases as you will be hooking the new Central Admin site to the original DB.
If you check IIS you will see that the Central Administration web application has disappeared leaving only your portal web apps and the OfficeServerApplication
- Run the SP configuration wizard on the new server (DEV02W2K3) and recreate the Central Administration site.
- Select: Do not disconnect from the configuration database
- Select: Advanced Settings
- Select: Use this machine to host the web site
- Select: Next / Ok
- Open central administration and check the servers in the farm – you should see Central Administration now hosted on DEV02W2K3:

- Check all your services are running – search may need restarting and you may need to reset the index role in the Shared Service Provider properties.
- Check your event logs and work through any issues.
Add a new server to a MOSS SP1 farm
- Backup SharePoint.
- Build the new SharePoint server (DEV02W2K3) and install:
- Windows Server 2003 Enterprise Edition
- NET 2.0
- NET 3.0
- MOSS 2007 – do not run the SP configuration wizard
- Install MOSS SP1 on the new server (DEV02W2K3):
- Run the WSS upgrade WSS SP1 downloads
- If prompted close the configuration wizard.
- Run the Office upgrade MOSS SP1 downloads
- Run the configuration wizard:
- Select: Connect to an existing server farm
- Retrieve and select the existing configuration database (MOSS_Config_DEV01W2K3) from the SQL box
- Select: Do not host Central Administration on this server
- Select: Next / Ok
- Go to Central Administration and check the farm topology. You should now see both SP1 servers (DEV01W2K3 & DEV02W2K3) in the farm. Note that they both show the SP1 version number 12.0.0.6219.

Saturday, February 09, 2008
Error when you try to edit the content source schedule in Microsoft Office SharePoint Server 2007: "Access is denied"
| Article ID | : | 926959 |
| Last Review | : | October 1, 2007 |
| Revision | : | 2.4 |
SYMPTOMS
When you try to create a new schedule or change an existing schedule for the content source in Microsoft Office SharePoint Server 2007, you receive the following error message:
Access is denied
CAUSE
This issue occurs when the WSS_WPG group account does not have the correct permissions to the %windir%\Tasks folder on the computer that is running the Office SharePoint Server 2007 indexing service.
WORKAROUND
To work around this issue, you must add the WSS_WPG group to the Tasks folder. To do this, follow these steps:| 1. | Use an account that has administrative permissions to log on to the computer that is running the Office SharePoint Server 2007 indexing service. | ||||
| 2. | Click Start, click Run, type cmd, and then click OK. | ||||
| 3. | At the command prompt, type the following command, and then press ENTER: attrib –s %windir%\tasks Note In this example, %windir% is the path of the Windows folder. For example, the path can be C:\Windows. Note If Windows Explorer is open when you make this change, you will not see the extra tab in Windows Explorer. If Windows Explorer is already open, close and then reopen it before you perform step 4. | ||||
| 4. | In Windows Explorer, right-click the Tasks folder, and then click Properties. | ||||
| 5. | In the Tasks Properties dialog box, click the Security tab, and then click Add | ||||
| 6. | In the Select Users, Computers, or Groups dialog box, type WSS_WPG in the Enter object names to select box, and then click OK. | ||||
| 7. | Grant the following permissions for the WSS_WPG account, and then click OK:
| ||||
| 8. | Click Start, point to Administrative Tools, and then click Internet Information Services (IIS) Manager. | ||||
| 9. | In Internet Information Services (IIS) Manager, right-click ComputerName (local computer), click All Tasks, and then click Restart IIS. | ||||
| 10. | Click Start, click Run, type cmd, and then click OK. | ||||
| 11. | At the command prompt, type the following command, and then press ENTER: attrib +s %windir%\tasks Note This resets the Tasks Property back to the default view. |
Subscribe to:
Comments (Atom)